Pages

Saturday, February 22, 2014

I/D #1: Unit N Concept 7: How do SRTs and the UC relate?

Inquiry Activity Summary:The activity we completed in class was a throw back to geometry and the concept of special right triangles. We made the connection between these right triangles and the concept of the unit circle and how they are seen within them. With our radius of 1 (because a unit circle always has a radius of 1), we can figure out our lengths of each side of each triangle. Consequently, we can find the ordered pairs of the triangles that create the 30, 45, and 60 degrees.


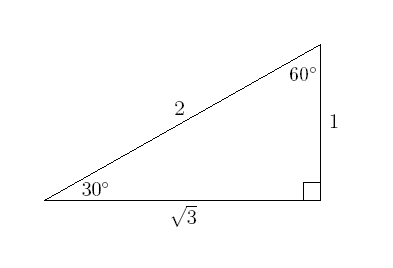
1. 30 degree triangle
Here we have a 30 degree triangle. The angle opposite of the 30 degree angle has a length of 1,  the adjacent side has the length of √3, and the hypotenuse side has a length of 2. Labeling the triangle, the horizontal side is x, the vertical side is y (just like on a graph!), and the hypotenuse is r (for radius). Because we're dealing with special right triangles in a unit circle, we need the hypotenuse to equal 1. In this case, we need to divide all sides by 2, which would give us:
x=√3/2
y=1/2
r=1
When we plot the triangle in a graph in quadrant 1, we have the labeled angle of 30 degrees as the origin or (0,0), the right angle would be (√3/2,0), and the 60 degree angle would be (√3/2, 1/2).


2. 45 degree triangle
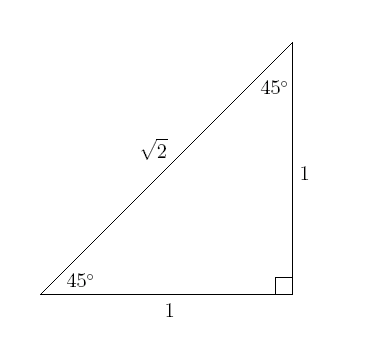
Here we have a 45 degree triangle. Notice that because 2 sides of the triangle has the same angle of 45 degrees, the opposite sides of each angle has the same length of 1. The hypotenuse of the 45 triangle is √2. Labeling the triangle, we need to divide all the sides by √2, which would give us:
x and y= √2/2
r=1
When we plot the triangle in a graph in quadrant 1, we have the labeled angle of 45 degrees as the origin or (0,0), the right angle would be (√2/2,0), and the 60 degree angle would be (√2/2,√2/2).


http://images.books24x7.com/bookimages/id_15618/fig441_03.jpg

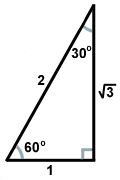
3. 60 degree triangle
If you couldn't already tell, the 60 degree triangle is the same as the 30 degree triangle, just flipped around. The side opposite of the 60 degree angle has the length of √3 ,the adjacent side has the length of 1, and the hypotenuse has the length of 2 (just like the 30 degree angle). Labeling the triangle, again we need to divide all sides by 2, which would give us:
x=1/2
y=√3/2
r=1
When we plot the triangle in a graph in quadrant 1, we have the labeled angle of 60 degrees as the origin or (0,0), the right angle would be (1/2,0), and the 60 degree angle would be (1/2,√3/2).


4. The activity and the use of these triangles allows us to understand and connect the parts of the unit circle, such as the length values and ordered pairs.  All the points of the unit circle go with either the 30, 45, or 60 degree angles, which are seen throughout the other quadrants. We notice a pattern of reference angles, radians, and ordered pairs. Doing these triangles of quadrant 1 allow us to comprehend the other quadrants because they are all the same, just flipped. We can also explain the ordered parts of the quadrant angles, 0/ 360 degrees is (1,0), 90 degrees is (0,1), 180 degrees is (-1,0), and 270 degrees is (0,-1).

5.  The triangles in this activity lie in the first quadrant. When we draw these triangles in the other quadrants, the ordered pairs switch around with negatives due to their position. For quadrant 2, all of the x values would be negative (left of y axis). For quadrant 3, both x and y values would be negative (left of y axis and below x axis). For quadrant 4, y values would be negative (under x axis).

Quadrant 2: 30 degree triangle: all x values negative

Quadrant 3: 45 degree triangle: all x and y values negative

Quadrant 4: 60 degree triangle: all y values negative

INQUIRY ACTIVITY REFLECTION

1. The coolest thing I learned from this activity was how all the 4 quadrants follow the same patterns of special triangles, making it easier to plot down the unit circles parts.
2. This activity will help me in this unit because I understand where the values of the Unit Circle comes from, that the numbers are not random but patterned, and that you can find them using special right triangles.
3. Something I never realized before about special right triangles and the unit circle is how they are all interconnected. I never noticed that you could be able to draw these special right triangles with in the Unit Circle and have all the ordered pairs the same, just a fix of negatives.

Tuesday, February 11, 2014

RWA# 1: Unit M Concept 4-6 - Conic Sections in Real Life - Hyperbolas (Concept 6)

 
 1. "The set of all points such that the difference in the distance from two points is a constant." (Kirch)

2. Algebraically and graphically,  a hyperbola was look like this:

 
or like this:

      (http://www.mathwarehouse.com/hyperbola/images/picture-of-hyperbola-vertical-transverse.gif)
 
For graphing each hyperbola, the direction depends on whether the "y" or "x" is negative. If the "y" is negative, then the hyperbolas will have a left and right direction (picture 1). If the "x" is negative, then the hyperbolas will have an up and down direction (picture 2).

The key features of hyperbolas are: center, transverse axis, conjugate axis, vertices, co-vertices, foci, eccentricity, and asymptotes. To find the center, we need to remember : "h" goes with "x" and "k" goes with "y". Going into our standard form, we find our "h" and our "k", our center (h,k). You can plot the center, and go on from there.

Looking at standard form, whichever term ("x" or "y") comes first will determine whether your transverse axis is horizontal or vertical. If "y" is the negative term, that tells us that our transverse axis will be horizontal. If "x" is the negative term, that tells us that our transverse axis will be vertical. Knowing this, we will know that our conjugate axis must be the opposite. So if our transverse axis is vertical, our conjugate axis will be horizontal and vice versa. (Side note: By knowing if the axes are horizontal or vertical, we will know if our lines will be "x=" or "y=". And because we know our axes go through our center, we know those "x=h" and "y=k".) The distance of the transverse axis is 2a ("a" is the square root of the denominator beneath the first term) and the distance of the conjugate is 2b ("b" is the square root of the denominator beneath the second term). To determine your transverse and conjugate axes graphically, look at the branches. If your branches go left and right, your transverse axis is horizontal. If your branches go up and down, your transverse axis is vertical. If you want to know the length of either of the axes, simply count the units (to find "a" or "b", divide the entire length of the axis by 2).

Graphically, the vertices are the ends of the transverse axis; just look at the end points and you have the vertices. Algebraically, all you need to know is what your "a" is. If your transverse axis is "x=" then you know that the "x's" in your vertices will remain the same as your center. From there, all you need to do is add and subtract "a" to "k". The same would for the co-vertices. Look for the end points of the conjugate axis on your graph. Algebraically, find "b" and add that to the value that is changing ("x" or "y").

Your foci is the same idea, with the adding to either the "x" or "y" values of your center (because your foci are "c" units away from your center). The focus will always be on the transverse axis long side the vertices.
"Eccentricity is a measure of how much the conic section deviates from being circular" (Kirch). For a hyperbola, it must be greater than 1. Algebraically, to find the eccentricity, we use the formula "e=c/a."

Unlike the other conics, hyperbolas have asymptotes (restrictions). To find the asymptotes algebraically, we use between two formulas depending on the direction of the transverse axis. If it is horizontal, then we use y= k± b/a (x-h). If it is vertical, then it is y=k± a/b (x-h). On a graph, you will notice the two dotted lines making an X going through the center and corners of the box: that would be your asymptotes. Notice how the hyperbolas are drawn really close to them, but never touches!

   If you need an example to put all of this information together, here is a video to help you visually!

                                         (http://www.youtube.com/watch?v=Z6cwpsDC_5A)
3. Real world applications of hyperbolas can be seen in cooling towers for nuclear reactors.  When building cooling towers, there were problems in creating a building that would be able to "withstand high winds" and "intense conditions with as little material as possible". (http://www.pleacher.com/mp/mlessons/calculus/apphyper.html) Eventually, engineers discovered the benefits of creating these towers into the shape of a 3D hyperbola. 

By building these towers into hyperboloids, they are able to stand up to high winds and use less material. "A 500 foot tower can be made of a reinforced concrete shell only six to eight inches wide." (http://www.pleacher.com/mp/mlessons/calculus/apphyper.html) Also, they help the upward air flow move faster, cooling things faster and better.

 
Works Cited: